This project-based guide shows how you can build a NestJS microservices architecture faster using Cursor as your pair programmer. We will build a real-world e-commerce system with three services: User, Product, and Order, using PostgreSQL, RabbitMQ, and Docker. Cursor helps generate scaffolds, message queues, and even test cases with simple, focused prompts. You’ll see where AI can speed up your workflow (e.g., boilerplate, config, repetitive code) and where human judgment is still relevant.
By the end, you’ll have a working microservice system and a repeatable method for letting AI handle the grunt work so you can focus on system design. Also, note that even though we are using Cursor AI here, this can be done similarly with Copilot or Windsurf.
Prerequisites
To follow along with this tutorial, you must make sure you have the following:
- Cursor installed locally
- Node.js and Docker are installed
- Basic understanding of TypeScript
Project Overview
What we’re building: A basic e-commerce system with 3 microservices:
- User Service
- Product Service (catalog, inventory)
- Order Service (placing orders, status tracking)
Tech Stack: NestJS, PostgreSQL, RabbitMQ (for communication)
Using Cursor AI to Scaffold Services
The application we will build in this tutorial will consist of API services (User, Products, and Orders). These APIs will act as microservices that communicate with each other based on certain actions.
To get started, open the Nest project you just created on Cursor, then activate the chat panel on Cursor with Crtl + l. Then select agent mode, which will enable Cursor to add, delete, and update files when needed. Agent mode is also the best for building with Cursor.
You can now provide a prompt like this and submit.
Build a basic API system using NestJS, with 3 independent microservices:
User Service: Manages user authentication and profiles. Use a hard-coded list of users in memory. Some users should be marked as authenticated, others as unauthenticated.
Product Service: Handles product catalog and inventory. Use PostgreSQL for storing products (name, description, price, quantity).
Order Service: Handles order placement and tracking. Orders should reference users and products. Use PostgreSQL for storing orders.
Use RabbitMQ as the communication mechanism between services. For example:
When an order is created, the Order Service should verify the user via the User Service and reduce product quantity by communicating with the Product Service.
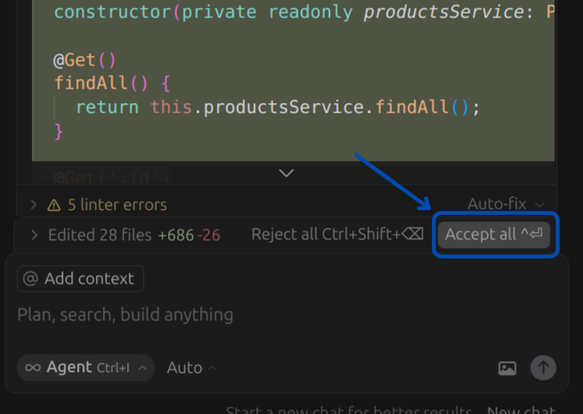
After submitting the prompt, you would be provided with the code you need to build the microservices. Press the “Accept all” button after all the output has been generated.
⚠️ Note: While it's tempting to “just accept the changes,” always review Cursor’s output carefully. Like any AI tool, Cursor can be inconsistent, especially when dealing with complex logic, file structures, or inter-service dependencies. It may generate incorrect or outdated code, or miss necessary context. Use it to accelerate your process, but don’t skip human review
You may also be prompted to run certain commands, you can go ahead and run the commands as needed.
After all the commands are run completely, you can now go ahead to accept all the code generated for you by clicking the apply button.
In the README file, you will have the commands to run each service. This is what I have in mine:
# NestJS Microservices Example

This project demonstrates a microservices architecture using NestJS, RabbitMQ, and PostgreSQL.

## Services

1. User Service (Port 3001)
   - Manages user authentication and profiles
   - Uses in-memory storage for users

2. Product Service (Port 3002)
   - Handles product catalog and inventory
   - Uses PostgreSQL for storage

3. Order Service (Port 3003)
   - Handles order placement and tracking
   - Uses PostgreSQL for storage

## Prerequisites

- Node.js (v16 or later)
- Docker and Docker Compose

## Setup

1. Start the infrastructure services (PostgreSQL and RabbitMQ):
```bash
docker-compose up -d
```

2. Install dependencies:
```bash
npm install
```

3. Install dependencies for each service:
```bash
cd services/user-service && npm install
cd ../product-service && npm install
cd ../order-service && npm install
```

4. Start all services:
```bash
npm run start:all
```

## Infrastructure Services

### PostgreSQL
- Host: localhost
- Port: 5432
- Username: postgres
- Password: postgres
- Databases: product_service, order_service

### RabbitMQ
- Host: localhost
- AMQP Port: 5672
- Management UI: http://localhost:15672
- Username: guest
- Password: guest

## API Endpoints

### User Service (Port 3001)
- GET /users - List all users
- GET /users/:id - Get user by ID
- POST /users/verify - Verify user authentication

### Product Service (Port 3002)
- GET /products - List all products
- GET /products/:id - Get product by ID
- POST /products - Create new product
- PATCH /products/:id/quantity - Update product quantity

### Order Service (Port 3003)
- GET /orders - List all orders
- GET /orders/:id - Get order by ID
- POST /orders - Create new order
Yours might be different so that you can access my code on GitHub.
Review and Refine code Cursor Generates
While building with AI, you will definitely come across some issues that will need correction or updating. In this section, we will see how we can handle some of these issues. Please note that there may be more issues since we are building a some worth big project with a lot of context, so the AI is going to miss a lot of things.
1. Missing tsconfig.json in Service Directories
When running npm run start:all, each microservice fails to start because the tsconfig.json file is missing in their respective directories (user-service, product-service, and order-service). NestJS relies on this TypeScript configuration file to compile and run the services correctly. As a result, all three services exit prematurely with errors indicating the missing file.
To fix this issue, I just pasted in the error I got as it is as the prompt and was able to get a solution. Be sure to accept any request to run commands, then finally accept all changes.
2. Dockerizing the services
In my initial output, there wasn’t any docker-compose file to run Postgres and RabbitMQ. To get this done, I will send the following prompt in the chat.
Add docker compose file to run Postgres and RabbitMQ. Make sure to update the README to reflect this changes.
After that is run, you will be provided with a Docker compose file like this:
version: '3.8'

services:
  postgres:
    image: postgres:15
    container_name: nest-postgres
    environment:
      POSTGRES_USER: postgres
      POSTGRES_PASSWORD: postgres
      POSTGRES_MULTIPLE_DATABASES: product_service,order_service
    ports:
      - "5432:5432"
    volumes:
      - postgres_data:/var/lib/postgresql/data
      - ./docker-scripts/create-multiple-postgresql-databases.sh:/docker-entrypoint-initdb.d/create-multiple-postgresql-databases.sh
    healthcheck:
      test: ["CMD-SHELL", "pg_isready -U postgres"]
      interval: 5s
      timeout: 5s
      retries: 5

  rabbitmq:
    image: rabbitmq:3-management
    container_name: nest-rabbitmq
    ports:
      - "5672:5672"   # AMQP protocol port
      - "15672:15672" # Management UI port
    environment:
      - RABBITMQ_DEFAULT_USER=guest
      - RABBITMQ_DEFAULT_PASS=guest
    volumes:
      - rabbitmq_data:/var/lib/rabbitmq
    healthcheck:
      test: ["CMD", "rabbitmq-diagnostics", "check_port_connectivity"]
      interval: 5s
      timeout: 5s
      retries: 5

volumes:
  postgres_data:
  rabbitmq_data:
To build and run the server for Postgres and RabbitMQ run the following command in the root directory of your project.
docker compose up -d3. 'users.service.ts' Is Not Recognized as a Module
The NestJS application fails to compile because users.service.ts is not being recognized as a valid module by TypeScript. This usually happens when the file is missing an export (e.g., export class UsersService) or contains a syntax error. As a result, import statements in users.controller.ts and users.module.ts throw TS2306 errors during compilation.
To fix this issue, I just pasted in the error I got as it is, as the prompt, and was able to get a solution, just like I did in the previous error.
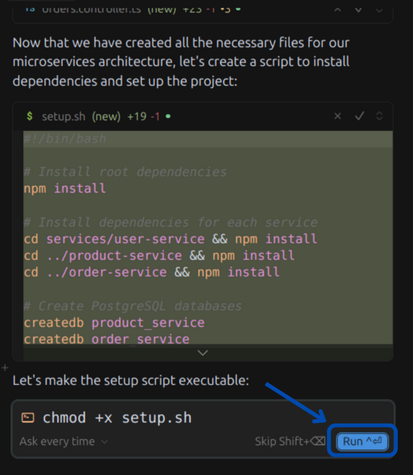
Running the Application
There are three services that will need to be running simultaneously for this application to work as expected. The shell script which runs all the Nestjs services at the same time with one command. This is what the shell script looks like:
#!/bin/bash
# Install root dependencies
npm install
# Install dependencies for each service
cd services/user-service && npm install
cd ../product-service && npm install
cd ../order-service && npm install
# Create PostgreSQL databases
createdb product_service
createdb order_service
# Make sure RabbitMQ is running
echo "Please ensure RabbitMQ is running on localhost:5672"
echo "Setup complete! You can now start the services using:"
echo "npm run start:all"
docker-compose up -d
And you can run this at the root of your project or where ever that file exists. After that, run the Docker compose file with the following command.
docker-compose up -d
You can now log in to your RabbitMQ service with the credentials provided
in the Docker compose file. Here you will see all the messages sent and
received in the microservice. With the way microservices are set up,
I will be able to see RabbitMQ in action when I create an order.
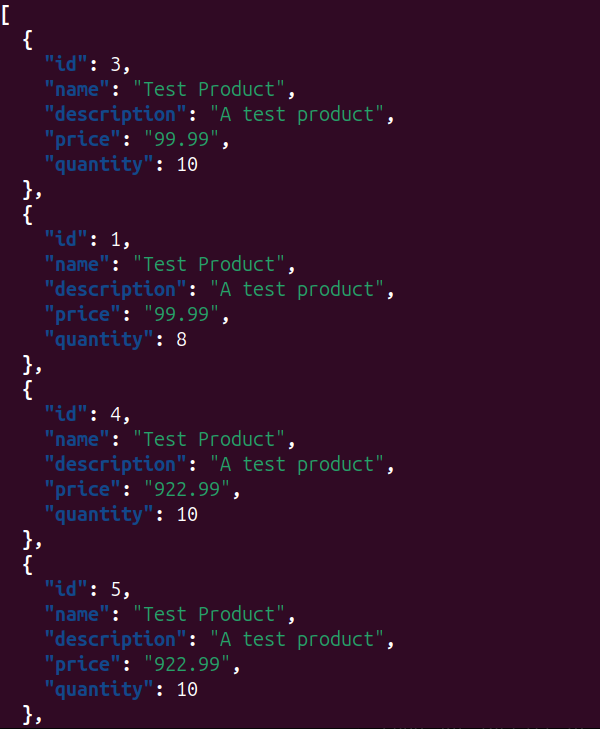
To be able to create an order, we need products.
Use the following command to create as many products as you want.
# Create new product
curl -X POST http://localhost:3002/products \
-H "Content-Type: application/json" \
-d '{
"name": "Test Product",
"description": "A test product",
"price": 99.99,
"quantity": 10
}'
Confirm that the products were created with the following command:
# List all products
curl http://localhost:3002/products | jq
Output:
Now, when you create an order with the following command, you will see the request get triggered on RabbitMQ.
curl -X POST http://localhost:3003/orders \
  -H "Content-Type: application/json" \
  -d '{
    "userId": 1,
    "productId": 1,
    "quantity": 2
  }'
Using Cursor Context to Scale Beyond Boilerplate
Building real microservices isn’t just about writing code fast, it’s about getting it right. Cursor’s power lies not only in how quickly it scaffolds services but in how well it can align with your architecture, domain rules, and team standards, if you give it the right context.
When working with Cursor, “context” is what tells the AI what you're trying to do (intent) and what already exists (state). Cursor’s agent relies on this context to predict what to generate next. Without it, it either hallucinates or makes guesses based on patterns it assumes you want, often leading to misaligned, throwaway code.
To guide Cursor effectively, you need to provide explicit and structured context in a file that it can read and reuse. This is where the cursor.context.md file comes in.
How Context Works in Cursor
Cursor splits context into two key types:
- Intent context: Your instructions. Think of this as your "prompt." For example: “Build a NestJS microservice that processes orders and checks product inventory via RabbitMQ.”
- State context: The reality Cursor is working in. That includes code, logs, schema, rules, architecture descriptions, and anything that helps Cursor understand the current system’s shape.
Cursor’s agent combines both to decide what code to write, refactor, or debug. When the context is shallow or ambiguous, the model may generate boilerplate that doesn't reflect your actual architecture or domain.
For a microservice architecture, a good cursor.context.md is like writing your team’s onboarding README, but for Cursor. It should contain:
- Your business domain (e.g., users place orders for products with stock constraints)
- Your architectural constraints (e.g., each service has its own DB; all comms via RabbitMQ)
- Conventions and standards (e.g., use DTOs, class-validator, store UTC timestamps)
- Technology stack (e.g., NestJS, PostgreSQL, TypeORM, RabbitMQ)
This file becomes the “intent context.” Cursor reads every time it generates or edits code. Without it, you may get default choices like Axios for internal calls, SQLite for storage, or HTTP between services, breaking your intended architecture.
Aligning Cursor with Your Architecture
Let’s say you want to scaffold a Product Service that:
- Exposes gRPC or RabbitMQ endpoints (not REST)
- Validates inputs using DTOs and decorators
- Interacts with PostgreSQL via TypeORM
- Emits events when inventory drops below a threshold
If you don’t write this into your context, Cursor will likely assume REST + Axios + a basic controller/service split, which may technically work but won’t fit your production setup.
Instead, your cursor.context.md should clearly define those expectations up front, so Cursor adapts accordingly.
Practical Cursor Context Tips
Here’s how to make context actionable in your workflow:
- Use @file, @folder, or @code references during prompting if you're asking Cursor to modify something specific. This keeps the context surgically focused.
- Define reusable rules (e.g., “Always use UTC timestamps in entities”) so Cursor can apply them in multiple files or services.
- Add your cursor.context.md to version control so the rest of your team, and future Cursor sessions, can benefit from the same architectural clarity.
- Put this file at the root of your repo and use the @file:cursor.context.md reference in Cursor when prompting it.
Example :
Scaffold a NestJS microservice that creates an order, deducts inventory from the Product Service over RabbitMQ, and stores the order in PostgreSQL.
@file:cursor.context.md


# Project Context for Cursor Agent
## Business Domain
This is an e-commerce system with three microservices:

- **User Service**: Handles auth (JWT), profiles, login/signup.
- **Product Service**: Manages products, categories, and inventory.
- **Order Service**: Manages placing orders and updating stock.
Each service is deployed independently, has its own **PostgreSQL** database, and communicates over **RabbitMQ** using **NestJS microservices**.

##  Tech Stack
- Language: **TypeScript**
- Framework: **NestJS**
- Transport: **RabbitMQ** (`@nestjs/microservices`)
- Database: **PostgreSQL** (via `TypeORM`)
- Validation: **class-validator**, **DTOs**
- Authentication: **JWT**
- Logging: `Logger` from `@nestjs/common`
- Timestamps stored in **UTC**

## Architecture Conventions
- Use `async/await` with error handling.
- Place business logic in `services/`, not `controllers/`.
- Use `DTOs` for all data validation and transformation.
- Each service listens only to relevant RabbitMQ patterns.

## Creating a New Microservice
When creating a new microservice:
1. **File Structure**:
nest-microservices/
└── services/
    ├── <feature>-service/
        └── src/

2. **RabbitMQ Integration**:
- Define patterns like `service.domain.action` (e.g., `inventory.product.reserved`).
- Use `@MessagePattern(...)` for subscribers.
- Always include `correlationId`, `timestamp` in payloads.

3. **Database Setup**:
- Use `TypeORM` with `snake_case` table names.
- Use UUIDs (`@PrimaryGeneratedColumn("uuid")`) as IDs.
- Entity relations should be lazy-loaded (`@ManyToOne(() => User)`).

4. **Testing**:
- Use `jest` and `@nestjs/testing`.
- Mock external services and message brokers.

6. **Dockerization**:
- Provide a `Dockerfile` and service-specific `docker-compose.override.yml`.

## Message Bus Rules
- Use RabbitMQ only for service-to-service comms.
- Avoid HTTP/REST between internal services.
- Emit events on state changes; consumers must be idempotent.
- Message format:
```json
{
  "type": "product.created",
  "data": { ... },
  "correlationId": "...",
  "timestamp": "..."
}
```
Keep this updated. As your stack or conventions evolve, so should the context file.
Structuring Your Project with Rules
As you scale towards coordinating real-world microservices, consistency becomes non-negotiable. That’s where Cursor Rules come in.
Rules are Cursor’s way of persisting reusable, project-specific context. Unlike chat prompts or comments, rules are versioned files stored in your project that give the AI consistent, repeatable guidance, whether it’s generating code, scaffolding services, or interpreting your architecture.
In a microservice setup like the one we’re building (User, Product, and Order services in NestJS), rules allow you to:
- Define shared patterns, like how services expose RPC endpoints or how controllers are structured
- Standardize naming conventions (snake_case for message queues, PascalCase for DTOs)
- Keep boilerplate DRY (e.g., auth guards, logging middlewares)
- Guide the model with team-specific architecture decisions or internal libraries
Rules live in .cursor/rules/ and follow the .mdc format, Markdown with frontmatter metadata that controls how and when the rule is applied. You can scope rules to specific folders (backend/, auth/, gateway/), create reusable ones manually, or let Cursor generate them based on your chat history (/Generate Cursor Rules).
For example, instead of repeatedly prompting the model to “use our custom BaseService for all repositories,” you can encode that in a rule and let Cursor apply it automatically whenever it generates service code.
This is especially powerful in monorepos: different teams can maintain their own set of scoped rules while sharing global ones across the entire workspace.
To get started, run Ctrl + Shift + P, then search “New Cursor Rule”, or create an .mdc file manually under .cursor/rules/.
As your microservice codebase grows, rules help you maintain architecture discipline, improve prompt accuracy, and minimize repetitive setup For example, you can have testing conventions in the file .cursor/rules/testing-standards.mdc
description: Testing rules across all services
globs:
  - apps/**/__tests__/**

- Use `@nestjs/testing` to create test modules.
- Mock all outbound HTTP or MQ communication using `jest.mock()` or custom stubs.
- Place integration tests under `__tests__/integration/` and unit tests under `__tests__/unit/`.
- Run tests using `pnpm test` and ensure coverage is tracked with `jest --coverage`.
Conclusion
Cursor AI makes it much faster to build microservices with NestJS. It handles scaffolding, configuration, and repetitive code so you can focus on system design. With a working setup that includes PostgreSQL, RabbitMQ, and Docker, you now have a solid base to build and expand your own microservices system.
To build on this, you can think of prompts you can use to secure the environment variable in the Docker compose file. You can also go ahead to build out a complete.